How to place an Order using POS
Last updated: August 7, 2025
🧾 POS Screen – Clerk Guide
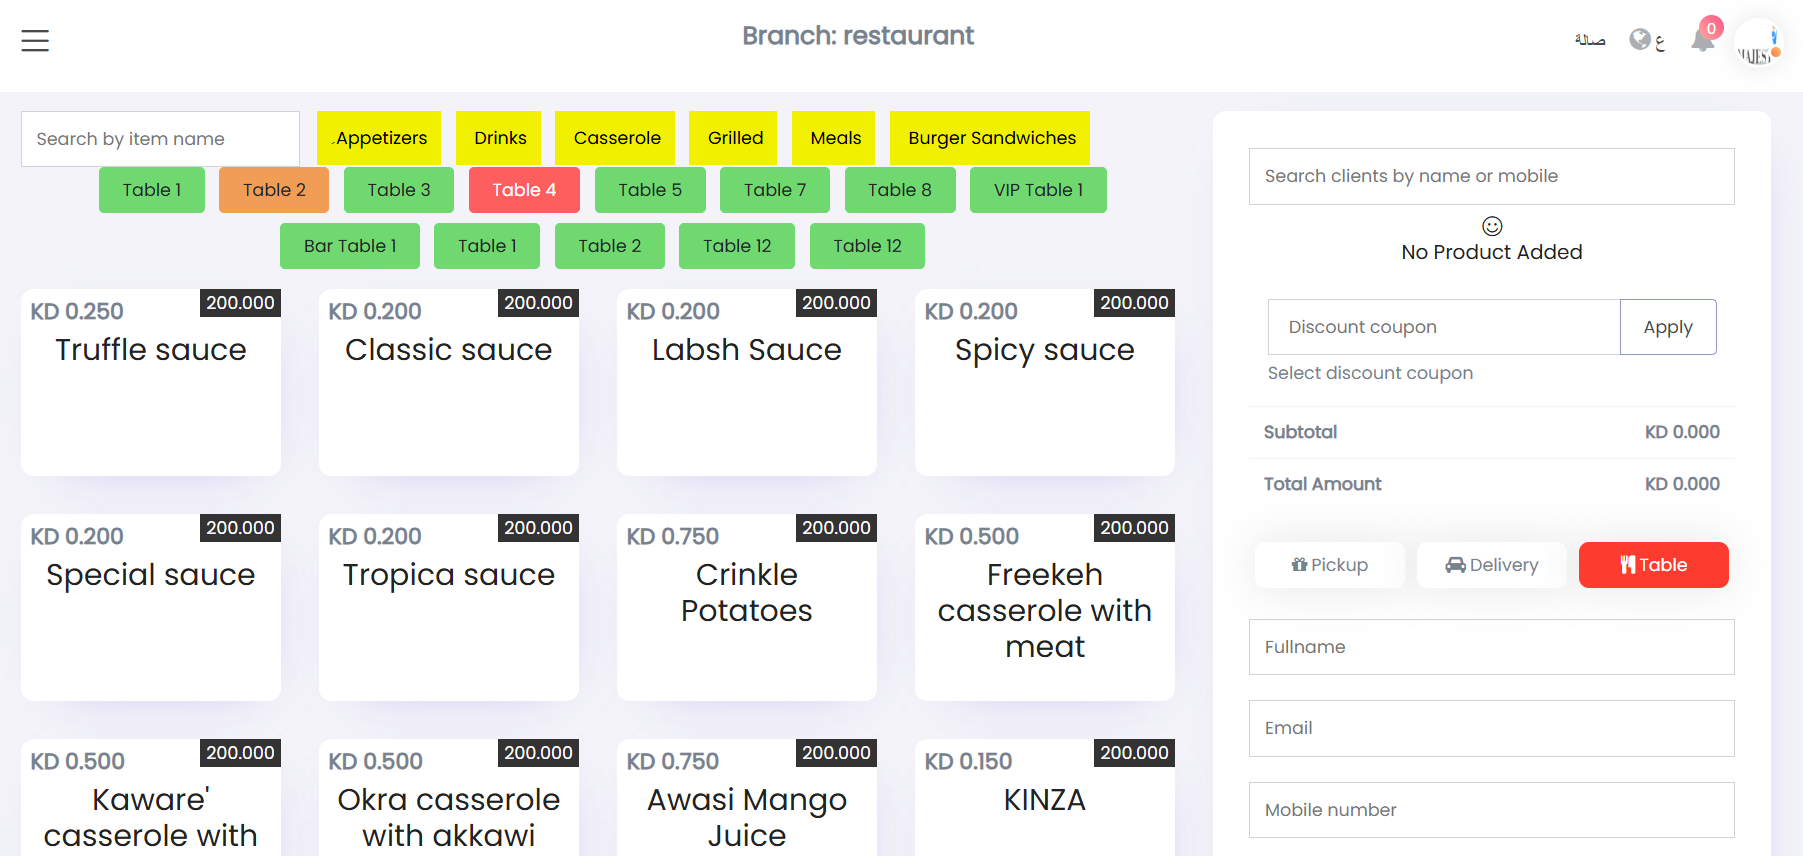
Welcome! This is your main screen for managing restaurant orders.
You’ll mostly work from this screen to take new orders, select tables, add items, and send orders to the kitchen.
📍 Screen Overview
The screen is divided into 2 main sections:
- 📦 Left Side: Menu Items, Categories, Tables
- 🧾 Right Side: Order Details, Customer Info, Totals
🔍 1. Search for Items
Use the white box at the top to search by item name.
🗂 2. Browse Categories → Subcategories
Tap a **yellow category button** (e.g., المشويات) to filter items.
- If the category has subcategories, they will appear below.
- Tap subcategories to narrow the list further.
### 🪑 3. Table Selection
Below the categories, you’ll see table buttons:
- 🟩 Green = Free (no order)
- 🟧 Orange = You are editing this table now
- 🟥 Red = Busy (has an open order)
➡️ Tap a table to:
- Start a new dine-in order
- Continue editing a current one
🍽 4. Add Items to Order
Tap any white item card to add it to the order/cart.
Each item shows:
- 💰 Price
- 📛 Name
- 🔢 Stock (999 = unlimited)
---
🔹 RIGHT SIDE – Order & Customer
🔵 1. Start a New Order
Tap the blue **“New Order”** button to start a fresh one.
> This clears the cart and resets the interface.
👤 2. Customer Search
Search by **name or mobile number**.
- A dropdown will show matching customers.
- Tap one to view their history.
You can:
- 🛒 Refill only **items** → tap **"العناصر"**
- 🧾 Load full order → tap **"طلبية"**
- 🏠 Use saved address → tap **"العنوان"**
🛒 3. View & Edit Cart
Each item added appears in the cart on the right.
You can:
- ➕ / ➖ adjust quantity
- ✏️ Add notes per item
- 🗑 Remove an item
🎟 4. Apply Coupon Code
Enter a promo code in the **coupon field**, then tap **Apply**.
🧮 5. Totals & Charges
You’ll see:
- Subtotal
- Delivery charge
- Final total
Everything updates automatically.
📍 6. Choose Order Type
Select from:
- 🏠 Delivery
- 📦 Pickup
- 🍽 Table (Dine-in)
> Order type affects which fields must be filled before submission.
---
✏️ 7. Fill Required Fields
Before placing an order, fill the required fields based on the selected order type.
🏠 Delivery
- Required: **City** and **Block**
- Optional: Street, house number, notes
📦 Pickup
- Required: **Customer mobile number**
- Optional: Name, notes
🍽 Table / Dine-In
- Select a table using:
- Table button (left section), or
- Dropdown in the “Table” tab (right)
---
💳 8. Select Payment Method
Choose how the customer is paying:
- 💵 Cash
- 💳 Card
- 🧾 Other methods (if available)
> Payment type is used in reports and summaries.
---
✅ 9. Submit the Order
At the bottom right, you’ll find two buttons:
🔵 **Place Order (تسجيل الطلبية)**
- The **main button** to use when adding orders.
- Keeps the order **open for edits** or additions.
- Best for ongoing dine-in, delivery, or pickup.
🛑 **Close Order**
Use only when:
- Dine-in customer has **paid and finished**.
- You’re registering a **completed manual order**.
- No further edits are needed.
---
🔁 Quick Summary
| Order Type | Required Fields | Button to Use |
|-------------|----------------------------|--------------------------|
| Pickup | Mobile number | **Place Order** (تسجيل الطلبية) |
| Delivery | City + Block | **Place Order** (تسجيل الطلبية) |
| Dine-In | Table selection | **Place Order**, then later **Close Order** |
---
💡 Tips for Fast Workflow
- Always start with **New Order** to clear old data
- Reuse past orders by tapping **العناصر**, **طلبية**, or **العنوان**
- For dine-in, tap the table on the left or use the dropdown
- Use item **notes** to send kitchen instructions
- Use **Place Order** to send to kitchen and keep editable
---
🎉 You're now ready to handle orders confidently and fast!
For the next steps, check:
- Editing or refunding orders
- Kitchen / chef display screen
- Delivery & driver dashboard


