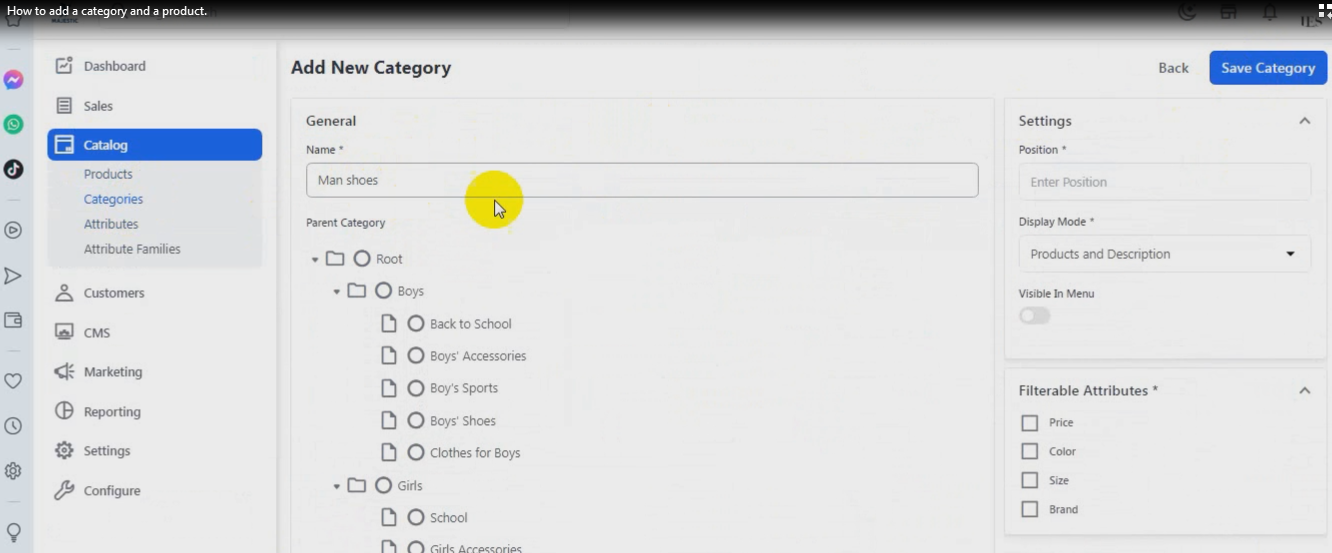
How to add a New Category
Last updated: October 27, 2025
طريقة إضافة قسم جديد – How to Add a New Category
### ✅ الخطوة 1: الضغط على زر "Create Category"
Arabic:
في أعلى يمين الشاشة، اضغط على الزر الأزرق المكتوب عليه: **Create Category**
English:
At the top-right corner, click the blue button labeled **Create Category**
✅ الخطوة 2: تعبئة نموذج إضافة القسم – Fill in the Category Form
ستظهر لك صفحة جديدة تحتوي على الحقول التالية:
1. **اسم القسم (Name)**
* في خانة **Name** تكتب اسم القسم الجديد الذي تريد إضافته أو تعديله.
* في الصورة اسم القسم هو "Classic Collection".
2. **اختيار القسم الأب (Select Parent Category)**
* هنا تختار القسم الأب الذي تريد أن يكون القسم الجديد تابعا له.
* يمكنك اختيار "Root" إذا كنت تريد إضافة القسم في المستوى الأساسي (قسم رئيسي).
* أو يمكنك اختيار قسم موجود مسبقًا مثل "Categories" أو أي قسم فرعي داخلها.
3. **الوصف (Description)**
* في مربع الوصف تكتب وصفًا تفصيليًا عن القسم الجديد.
* يمكن أن يكون نصًا بسيطًا أو يحتوي على تنسيقات مثل الخط العريض، المائل، القوائم، الروابط، إلخ.
4. **الشعار (Logo)**
* يمكنك رفع شعار القسم في هذا الجزء.
* ينصح بأن تكون دقة الصورة 110×110 بكسل.
5. **البانر (Banner)**
* رفع صورة بانر تعبر عن القسم.
* يفضل أن تكون دقة الصورة 1320×300 بكسل.
6. **إعدادات (Settings)**
* **Position:** تحدد ترتيب ظهور القسم في القائمة. الرقم 1 يظهر أولًا، والرقم الأكبر يظهر لاحقًا.
* **Display Mode:** يمكنك اختيار طريقة عرض القسم (مثل عرض المنتجات مع الوصف أو بدون وصف).
* **Visible In Menu:** إذا فعلت هذا الخيار يظهر القسم في قائمة الموقع.
7. **الخصائص القابلة للتصفية (Filterable Attributes)**
* تختار الخصائص التي يمكن للزائر تصفيتها في هذا القسم (مثل السعر، لون العدسة، النوع، وغيرها).
8. **حفظ التغييرات**
* بعد إكمال تعبئة البيانات والتأكد من صحتها، تضغط على زر **Save Category** في الأعلى يمين الصفحة لحفظ القسم الجديد أو التعديلات.
Adding a New Category:
1. **Category Name**
* In the **Name** box, type the name of the new category you want to add or edit.
* In the image, the category name is "Classic Collection".
2. **Select Parent Category**
* Here, select the parent category to which you want the new category to belong.
* You can choose "Root" if you want to add the category at the primary level (main category).
* Or, you can choose a pre-existing category such as "Categories" or any subcategory within it.
3. **Description**
* In the Description box, type a detailed description of the new category.
* It can be simple text or include formatting such as bold, italics, lists, links, etc.
4. **Logo**
* You can upload the category logo in this section.
* The image resolution is recommended to be 110 x 110 pixels.
5. **Banner**
* Upload a banner image that represents the category.
* The image resolution should be 1320 x 300 pixels.
6. **Settings**
* **Position:** This determines the order in which the category will appear in the list. Number 1 appears first, and higher numbers appear later.
* **Display Mode:** You can choose how the category will be displayed (such as displaying products with or without a description).
* **Visible In Menu:** If you enable this option, the category will appear in the site menu.
7. **Filterable Attributes**
* This selects the attributes that the visitor can filter in this category (such as price, lens color, type, etc.).
8. **Save Changes**
* After completing and verifying the correctness of the information, click the **Save Category** button in the top right of the page to save the new category or changes.
